スプライン補間
急遽必要になったのでCommon Lispでスプライン補間の実装がないか調べたが、どうもないので以下のPDFを見ながら適当に実装してみる。
効率とかは知らぬ。途中、三重対角行列の逆行列を計算しているがO(N)で求める方法があるらしい。今回は普通にオレオレユーティリティの中のGauss-Jordan法を使う。
(ql:quickload :wiz-util) ; https://github.com/masatoi/wiz-util
(ql:quickload :clgplot) ; https://github.com/masatoi/clgplot

(defun make-spline (x-list y-list)
  (let* ((h (wiz:diff-list x-list))
         (dy (wiz:diff-list y-list))
         (v (wiz:nlet iter ((h h) (dy dy) (product nil))
              (if (null (cdr h))
                (nreverse product)
                (iter (cdr h)
                      (cdr dy)
                      (cons (* 6 (- (/ (cadr dy) (cadr h))
                                    (/ (car dy) (car h))))
                            product)))))
         (mat-size (- (length x-list) 2))
         (vvec (make-array (list mat-size 1) :element-type 'double-float))
         (mat (make-array (list mat-size mat-size) :element-type 'double-float :initial-element 0d0)))
    (loop for j from 0 to (1- mat-size)
          for hj-1 in h
          for hj in (cdr h)
          for vj in v
          do
       (setf (aref vvec j 0) vj) ; init vvec
       (cond ((= j 0)            ; init mat
              (setf (aref mat 0 0) (* 2 (+ hj-1 hj))
                    (aref mat 0 1) hj))
             ((= j (1- mat-size))
              (setf (aref mat (1- mat-size) (- mat-size 2)) hj-1
                    (aref mat (1- mat-size) (1- mat-size)) (* 2 (+ hj-1 hj))))
             (t (setf (aref mat j (1- j)) hj-1
                      (aref mat j j) (* 2 (+ hj-1 hj))
                      (aref mat j (1+ j)) hj))))
    (let* ((mat-1 (wiz:m-1 mat))
           (uvec (wiz:m* mat-1 vvec))
           (u (append (cons 0d0 (loop for i from 0 to (1- mat-size) collect (aref uvec i 0)))
                      '(0d0)))
           (b (mapcar (lambda (uj) (/ uj 2)) u))
           (a (mapcar (lambda (uj+1 bj hj) (/ (- uj+1 (* 2 bj)) (* 6 hj))) (cdr u) b h))
           (c (mapcar (lambda (hj yj+1 aj bj dj)
                        (/ (- yj+1 (* aj hj hj hj) (* bj hj hj) dj) hj))
                      h (cdr y-list) a b y-list)))
      (lambda (x)
        (let* ((pos0 (position-if (lambda (xj+1) (<= x xj+1)) x-list)) ; x-list must be sorted
               (pos (cond ((null pos0) (- (length x-list) 2))
                          ((<= pos0 0) 0)
                          (t (1- pos0))))
               (xj (nth pos x-list))
               (yj (nth pos y-list))
               (aj (nth pos a))
               (bj (nth pos b))
               (cj (nth pos c)))
          (+ (* aj (expt (- x xj) 3))
             (* bj (expt (- x xj) 2))
             (* cj (- x xj))
             yj))))))
make-spline関数でデータ点を補間した値を返す関数が生成される。適当なデータ点を与えてみる。
(defparameter spline-func
  (make-spline '(0d0 1.5d0 2.2d0 3.7d0 3.9d0 4.5d0 5.1d0 6.6d0 7.7d0) ; x-list
               '(1d0 3d0 2d0 5d0 1d0 4d0 3.1d0 1d0 5d0)))             ; y-list
結果をプロットしてみると、
(let ((x-list (wiz:seq -1d0 8d0 :by 0.1d0)))
  (clgp:plot-lists (list (mapcar spline-func x-list)
                         '(1d0 3d0 2d0 5d0 1d0 4d0 3.1d0 1d0 5d0))
                   :x-lists (list x-list
                                  '(0d0 1.5d0 2.2d0 3.7d0 3.9d0 4.5d0 5.1d0 6.6d0 7.7d0))
                   :style '(lines points)))
Common LispからCの機能を利用する
先日、Common Lisp RecipesのPDF版を$17.76で安売りしていたので買ってみた。この本の19章がLispから外部機能を利用する話で、これがCFFIの簡潔なチュートリアルになっている。この辺を見ながら色々実験してみたのでまとめてみる。
Common Lispでは外部機能へのインターフェース(FFI)は言語仕様に記載されていないので、各Lisp処理系が独自に実装している。それらのAPIの違いを吸収するCFFIというライブラリがある。
(ql:quickload :cffi)
共有ライブラリ作成
まずCでべき乗を計算する関数を書く。
double power (double base, int exponent) {
  int i;
  double result = 1.0;
  for (i = 1; i <= exponent; i++)
    result *= base;
  return result;
}
これをtest.cに保存してコンパイルし、共有ライブラリを作る。
gcc -fpic -shared test.c -o test.so
ライブラリ読み込み
共有ライブラリはload-foreign-library関数によって読み込む。
直接絶対パスを指定してライブラリを読み込む場合はこう書く。
(cffi:load-foreign-library "/home/wiz/cl/clr/ffi/test.so")
フルパスじゃなくてライブラリのファイル名だけ書く方法もある。その場合デフォルトのサーチパスから探される。例えばLinuxなら/libと/usr/libから、MacOSなら~/lib、/usr/local/lib、/usr/libから探される。サーチパスに追加するにはcffi:*foreign-library-directories*を変更する。
(push #P"/home/wiz/cl/clr/ffi/" cffi:*foreign-library-directories*)
(cffi:load-foreign-library "test.so")
:defaultキーワードを付けると拡張子も環境から自動で決まる。:orキーワードを付けると存在しているいずれかのライブラリを使う。
(cffi:load-foreign-library '(:default "test"))
(cffi:load-foreign-library '(:or "test.so.3" "test.so"))
より柔軟に環境に合わせた設定をするために、複数の環境ごとの設定をまとめて名前を付けることができる。
(cffi:define-foreign-library test-lib
  (:darwin (:or "test.3.dylib" "test.dylib"))
  (:windows (:or "test.dll" "test.dll"))
  (t (:default "test")))

(cffi:load-foreign-library 'test-lib)
LispからCの関数を呼び出す
(cffi:foreign-funcall "power"            ; 関数名
                      :double (sqrt 2d0) ; 引数1
                      :int 2             ; 引数2
                      :double)           ; 返り値の型
;; => 2.0000000000000004d0
foreign-funcallで毎回型を指定するのは面倒なのでpowerのラッパーを定義しておく。
(cffi:defcfun "power" :double
  (base :double)
  (exponent :int))

(power (sqrt 2d0) 2)
;; => 2.0000000000000004d0
Cの関数名は自動的にLisp風に変換される。例えば"c_power_num"だったらラッパー関数の名前はc-power-numになる。明示的にラッパー関数に名前をつける場合はこのように書く。
(cffi:defcfun ("c_power_num" power) :double
  (base :double)
  (exponent :int))
Cのポインタの取り扱い
ポインタの例としてK&Rとかにも出てくる、2つの値を交換する関数swapを定義する。
void swap (int *a, int *b) {
  int t = *b;
  *b = *a;
  *a = t;
}
次に、LispからCのswap関数を呼ぶためのラッパーを定義する。この際、引数の型に:pointerを指定する。
(cffi:defcfun swap :void
  (a :pointer)
  (b :pointer))
この関数を呼び出すには、まずLisp側からCのメモリ領域を生成し、そのメモリ領域へのポインタを表すオブジェクトを作ってswap関数に渡す。
以下は実際にforeighn-alloc関数でint型のCオブジェクトのメモリ領域を2つ生成し、swap関数を適用する例。Cのメモリ領域はGCによって回収されないので、最後にforeign-free関数で開放してやる必要がある。
(defparameter *a* (cffi:foreign-alloc :int))
;; => #.(SB-SYS:INT-SAP #X7FFFDC000F80) ; system-area-pointer

;; ポインタが差すデータを参照するにはmem-refを使う。setfで代入もできる
(cffi:mem-ref *a* :int)           ; =>  0
(setf (cffi:mem-ref *a* :int) 10) ; => 10
(cffi:mem-ref *a* :int)           ; => 10

(defparameter *b* (cffi:foreign-alloc :int :initial-element 20))

;; 外部関数のswapを呼び出す
(swap *a* *b*)
(cffi:mem-ref *a* :int) ; => 20
(cffi:mem-ref *b* :int) ; => 10

(defparameter lst
  (list (cffi:mem-ref *a* :int) (cffi:mem-ref *b* :int)))

;; メモリ開放
(cffi:foreign-free *a*)
(cffi:foreign-free *b*)

lst ; => (20 10)
メモリ開放後もlstが値を保持しているので、mem-refする度にLispオブジェクトを生成していることが分かる。
with-foreign-objectsマクロを使うと上の一連の流れをまとめてやることができる。
(cffi:with-foreign-objects ((a :int) (b :int))
  (setf (cffi:mem-ref a :int) 10
        (cffi:mem-ref b :int) 20)
  (print (list (cffi:mem-ref a :int) (cffi:mem-ref b :int)))
  (swap a b)
  (list (cffi:mem-ref a :int) (cffi:mem-ref b :int)))
;; (10 20)
;; => (20 10)
特に何も指定しなくてもメモリ開放が保証されるのでこちらの方が安全といえる。
Cのポインタは型付きだが、Lispのポインタは何でも指せる。その代わりにmem-refに (cffi:mem-ref :int) のように型情報を付ける必要がある。
ラッパー関数の引数のポインタに型を付けることもできるが、型チェックとかはしてくれない。試しにラッパー関数ではintへのポインタと宣言しているところにdoubleで確保した領域へのポインタを渡してみるとどうなるか。
(cffi:defcfun swap :void
  (a (:pointer :int))
  (b (:pointer :int)))

;; bをdoubleにしてswapを呼んでみる
(cffi:with-foreign-objects ((a :int) (b :double))
  (setf (cffi:mem-ref a :int) 42
        (cffi:mem-ref b :double) 23d0)
  (print (list (cffi:mem-ref a :int)
               (cffi:mem-ref b :double)))
  (swap a b)
  (list (cffi:mem-ref a :double) (cffi:mem-ref b :int)))
;; (42 23.0d0)
;; => (0.0d0 42)
エラーは起こらないがswapした結果がおかしなことになる。
ここで何が起こっているかを理解するためには、mem-refで指定する型によって参照する領域が決まることを理解しておく必要がある。
例として、short型の領域を2つ生成し、それらをまとめて4バイトのfloat型として参照してみる。
(defparameter *test* (cffi:foreign-alloc :short :initial-contents (list 42 23)))

;; 型のサイズ
(cffi:foreign-type-size :short) ; => 2
(cffi:foreign-type-size :float) ; => 4

(list (cffi:mem-ref *test* :short)
      (cffi:mem-ref *test* :short 2) ; 先頭から2バイト先をshort型と解釈して参照する
      (cffi:mem-ref *test* :float))  ; short型2個をfloat型1個と解釈して参照する
;; => (42 23 2.1122753e-39)
このように問題なく参照できてしまう。
Cの配列の取り扱い
上の例でforeign-allocでshort型が2つ並んだ領域を作ったが、配列も基本的にこれと同じになる。
例えば、C側で次のように配列の総和を取る関数を定義したとする。
double sum (double *arr, int size) {
  int i;
  double result = 0.0;
  for (i = 0; i < size; i++) {
    result += arr[i];
  }
  return result;
}
これをLisp側から呼び出してみる。
(cffi:defcfun sum :double
  (arr :pointer)
  (size :int))

(defparameter *arr*
  (cffi:foreign-alloc :double
                      :initial-contents '(1d0 2d0 3d0 4d0 5d0 6d0 7d0 8d0 9d0 10d0)))

(loop for i from 0 below 10 collect
  (cffi:mem-aref *arr* :double i)) ; mem-refと違うことに注意
;; => (1.0d0 2.0d0 3.0d0 4.0d0 5.0d0 6.0d0 7.0d0 8.0d0 9.0d0 10.0d0)

(sum *arr* 10) ; => 55.0d0
foreign-allocはmake-arrayと似たような感じで、:initial-contentsでリストによって初期値を指定することができる。また:countキーワードで個数を指定して領域を取ってくることもできる。その際に:initial-elementを指定しておくとその値で埋め尽くされる。
配列を参照するにはmem-arefを使う。mem-refでは第3引数に先頭からのバイト数を指定していたが、mem-arefはインデックスになっているところが違う。
;; mem-refはバイト数
(cffi:mem-ref *arr* :double 0) ; => 1.0d0
(cffi:mem-ref *arr* :double 8) ; => 2.0d0
;; mem-arefはインデックス
(cffi:mem-aref *arr* :double 0) ; => 1.0d0
(cffi:mem-aref *arr* :double 1) ; => 2.0d0
mem-arefもsetfが使えるので、foreign-allocに:countキーワードを付けて長さで領域を取ってきてから値を代入して初期化するという方法もある。
(defparameter *arr2* (cffi:foreign-alloc :double :count 10))

(loop for i from 0 to (1- 10) do
  (setf (cffi:mem-aref *arr2* :double i) (+ i 1d0)))

(sum *arr2* 10) ; => 55.0d0

;; 後始末
(cffi:foreign-free *arr*)
(cffi:foreign-free *arr2*)
with-foreign-objectsのオプショナル引数に配列の長さを指定しても同じことができる。
(cffi:with-foreign-objects ((arr :double 10))
  (loop for i from 0 to (1- 10) do
    (setf (cffi:mem-aref arr :double i) (+ i 1d0)))
  (sum arr 10))
C側からLispの配列にアクセスするにはLisp処理系が対応していなければならないらしく、Lispworksとかにはそのインターフェースがあるらしいが、CFFIではサポートされてない。
Cの構造体の取り扱い
構造体の場合も関数と同じで、Cの定義に対応するものをLisp側でも定義する。
struct complex {
  double real;
  double imag;
};
double magnitude_squared (struct complex *c) {
  return c->real * c->real + c->imag * c->imag;
}
(cffi:defcstruct c-complex
  (real :double)
  (imag :double))

;; 構造体へのポインタを引数に取る関数
(cffi:defcfun "magnitude_squared" :double
  (c :pointer))
ここで定義した構造体のオブジェクトを生成するのにもこれまでと同様にforeign-alloc/with-foreign-object/with-foreign-objectsが使える。型としては'(:struct c-complex)を指定する。構造体のスロットにアクセスするにはforeign-slot-valueを使う。
(cffi:with-foreign-object (c '(:struct c-complex))
  (setf (cffi:foreign-slot-value c '(:struct c-complex) 'real) 3d0
        (cffi:foreign-slot-value c '(:struct c-complex) 'imag) 4d0)
  ;; 初期化した構造体へのポインタをCの関数へ渡す
  (sqrt (magnitude-squared c)))
;; => 5.0d0
Common Lispによる深層学習ライブラリMGL(2): 回帰問題の場合
前回はMNISTの分類問題を解いたが、今回は回帰問題の場合。
コード https://github.com/masatoi/mgl-user/blob/master/src/regression.lisp
データ点の表現とそれをまとめてモデルに設定する部分
分類と回帰で何が違うかというと、まず教師信号がラベルでなく実数ベクトルになるので、データ点の構造体を定義しなおす必要がある。それから分類では出力層のtargetにバッチサイズ分のリストを設定していたところを、回帰では教師信号を保持するlumpを別に作って、そのnodesスロットに教師信号ベクトルをバッチサイズ分まとめた行列を設定する。
;;; Data expression

(defstruct regression-datum
  (id nil :type fixnum)
  (target nil :type mat)
  (array nil :type mat))

;;;; Sampling, clamping, utilities

(defun sample-regression-datum-array (sample)
  (regression-datum-array (first sample)))

(defun clamp-regression-data (samples mat)
  (assert (= (length samples) (mat-dimension mat 0)))
  (map-concat #'copy! samples mat :key #'sample-regression-datum-array))

(defun sample-regression-datum-target (sample)
  (regression-datum-target (first sample)))

(defun clamp-regression-target (samples mat)
  (assert (= (length samples) (mat-dimension mat 0)))
  (map-concat #'copy! samples mat :key #'sample-regression-datum-target))

;;; Regression FNN
(defclass regression-fnn (fnn) ())

(defmethod set-input (samples (bpn regression-fnn))
  (let* ((inputs (find-clump 'inputs bpn))
         (targets (find-clump 'targets bpn)))
    (clamp-regression-data samples (nodes inputs))
    (clamp-regression-target samples (nodes targets))))
データの正規化
MNISTでは入力は[0,1]に正規化されていたので特に何もしていなかったが、データセットによっては入出力の各次元ごとに、平均を引いて標準偏差で割って平均0、分散1にする正規化をやった方がいいことがある。
;;; Copy dataset
(defun copy-regression-dataset (dataset)
  (let ((new-dataset (map 'vector (lambda (datum) (copy-regression-datum datum)) dataset)))
    (loop for new-datum across new-dataset
          for datum across dataset do
            (setf (regression-datum-array new-datum) (copy-mat (regression-datum-array datum))
                  (regression-datum-target new-datum) (copy-mat (regression-datum-target datum))))
    new-dataset))

;;; Normalize
(defun regression-dataset-average (dataset)
  (let* ((first-datum-array (regression-datum-array (aref dataset 0)))
         (first-datum-target (regression-datum-target (aref dataset 0)))
         (input-dim (mat-dimension first-datum-array 0))
         (output-dim (mat-dimension first-datum-target 0))
         (input-ave (make-mat input-dim))
         (output-ave (make-mat output-dim)))
    (loop for datum across dataset do
      (axpy! (/ 1.0 (length dataset)) (regression-datum-array datum) input-ave)
      (axpy! (/ 1.0 (length dataset)) (regression-datum-target datum) output-ave))
    (values input-ave output-ave)))

(defun regression-dataset-variance (dataset input-ave output-ave)
  (let* ((input-dim   (mat-dimension input-ave 0))
         (output-dim  (mat-dimension output-ave 0))
         (input-var   (make-mat input-dim))
         (output-var  (make-mat output-dim))
         (input-diff  (make-mat input-dim))
         (output-diff (make-mat output-dim)))
    (loop for datum across dataset do
      ;; input
      (copy! input-ave input-diff)
      (axpy! -1.0 (regression-datum-array datum) input-diff)
      (.square! input-diff)
      (axpy! (/ 1.0 (length dataset)) input-diff input-var)
      ;; output
      (copy! output-ave output-diff)
      (axpy! -1.0 (regression-datum-target datum) output-diff)
      (.square! output-diff)
      (axpy! (/ 1.0 (length dataset)) output-diff output-var))
    (values input-var output-var)))

(defun regression-dataset-normalize! (dataset &key test-dataset (noise-degree 1.0))
  (let* ((first-datum-array (regression-datum-array (aref dataset 0)))
         (input-dim (mat-dimension first-datum-array 0))
         (first-datum-target (regression-datum-target (aref dataset 0)))
         (output-dim (mat-dimension first-datum-target 0))
         (input-noise (make-mat input-dim :initial-element noise-degree))
         (output-noise (make-mat output-dim :initial-element noise-degree)))
    (multiple-value-bind (input-ave output-ave)
        (regression-dataset-average dataset)
      (multiple-value-bind (input-var output-var)
          (regression-dataset-variance dataset input-ave output-ave)
        (axpy! 1.0 input-noise input-var)
        (axpy! 1.0 output-noise output-var)
        (.sqrt! input-var)
        (.sqrt! output-var)
        (.inv! input-var)
        (.inv! output-var)
        (flet ((normalize! (datum)
                 (axpy! -1.0 input-ave (regression-datum-array datum))
                 (geem! 1.0 input-var (regression-datum-array datum) 0.0 (regression-datum-array datum))
                 (axpy! -1.0 output-ave (regression-datum-target datum))
                 (geem! 1.0 output-var (regression-datum-target datum) 0.0 (regression-datum-target datum))))
          (loop for datum across dataset do (normalize! datum))
          (if test-dataset
            (loop for datum across test-dataset do (normalize! datum)))
          'done)))))
ここでaxpy!が行列同士の足し算(というか alpha * X + Y の結果をYに代入する)、geem!が成分ごとの積を破壊的にやるMGL-MATの関数で、ほかにも成分ごとの平方根や逆数を代入する.sqrt!や.inv!など色々ある。これらの関数はCUDAによる高速化が効く。
学習部分とモニタリング
分類問題では評価は正答率によってだったが、回帰問題では予測したものと教師信号とのRMSE(平均二乗誤差の平方根)で測る。
learnerに持たせるmonitorには、測り方を意味するmeasurerとそれをまとめるcounterの2つのスロットがある。measurerに設定されているmgl-bp::costが予測と教師信号との差のL2ノルムを表す。counterには単純に平均を取るbasic-counterとRMSEで平均を取るrmse-counterがあり、今回はrmse-counterを設定する。
あとは大体分類と同じ。
;;; Monitoring
(defun log-regression-cost (optimizer learner)
  (when (zerop (n-instances optimizer))
    (report-optimization-parameters optimizer learner))
  (log-msg "train/test at n-instances: ~S (~A ephochs)~%" (n-instances optimizer)
           (/ (n-instances optimizer) (length (training optimizer))))
  (log-padded
   (let ((bpn (bpn learner))
         (monitors (monitors learner)))
     (append
      (monitor-bpn-results (make-sampler (training optimizer) :max-n 10000) bpn (list (car monitors)))
      (if (test optimizer)
        (monitor-bpn-results (make-sampler (test optimizer)) bpn (cdr monitors))))))
  (log-mat-room)
  (log-msg "---------------------------------------------------~%"))

(defun train-regression-fnn-with-monitor
    (fnn training &key test (n-epochs 3000) (learning-rate 0.1) (momentum 0.9))
  (let* ((optimizer (monitor-optimization-periodically
                     (make-instance 'segmented-gd-optimizer-with-data
                        :training training :test test
                        :segmenter (constantly
                                    (make-instance 'sgd-optimizer
                                       :learning-rate learning-rate
                                       :momentum momentum
                                       :batch-size (max-n-stripes fnn))))
                     `((:fn log-regression-cost :period ,(length training))
                       (:fn reset-optimization-monitors
                            :period ,(length training)
                            :last-eval 0))))
         (measurer (lambda (instances bpn)
                     (declare (ignore instances))
                     (mgl-bp::cost bpn)))
         (monitors (cons (make-instance 'monitor
                            :measurer measurer
                            :counter (make-instance 'rmse-counter
                                        :prepend-attributes '(:event "rmse." :dataset "train")))
                         (if test
                           (list (make-instance 'monitor
                                    :measurer measurer
                                    :counter (make-instance 'rmse-counter
                                                :prepend-attributes '(:event "rmse." :dataset "test")))))))
         (learner (make-instance 'bp-learner :bpn fnn :monitors monitors))
         (dateset (make-sampler training :n-epochs n-epochs)))
    (minimize optimizer learner :dataset dateset)
    fnn))

(defun train-regression-fnn-process-with-monitor
    (fnn training &key test (n-epochs 30) (learning-rate 0.1) (momentum 0.9) without-initialize)
  (with-cuda* ()
    (repeatably ()
      (if (null without-initialize)
        (init-bpn-weights fnn :stddev 0.01))
      (train-regression-fnn-with-monitor
       fnn training :test test :n-epochs n-epochs :learning-rate learning-rate :momentum momentum)))
  (log-msg "End")
  fnn)
モデル定義
ネットワークの定義部分もほとんど分類問題と同じだが、出力層の定義の仕方が少し違う。回帰問題の場合、出力層の活性化関数は恒等写像なので、予測結果は最後の->activationオブジェクトの出力部分になり、activations-output関数でアクセスできる。
出力層では予測と教師信号の二乗誤差を表す->squared-differenceと->lossを組み合わせる。->squared-differenceの生成関数の引数には->activationオブジェクトの出力部分とtargetsという名前を持つ->inputオブジェクトを与える。この->inputオブジェクトにset-inputで教師信号を設定する。
例えば、入力2次元、出力1次元のネットワークならこのように書ける。
;;;; Activation access utilities
(defun activations-output (activations)
  (aref (clumps activations) 3))

(defun find-last-activation (bpn)
  (let ((clumps-vec (clumps bpn)))
    (loop for i from (1- (length clumps-vec)) downto 0 do
      (let ((clump (aref clumps-vec i)))
      (typecase clump
        (->activation (return clump)))))))

(defparameter fnn-regression
  (build-fnn (:class 'regression-fnn :max-n-stripes 100)
    ;; Input Layer
    (inputs (->input :size 2))
    (f1-activations (->activation inputs :name 'f1 :size 1200))
    (f1 (->relu f1-activations))
    (f2-activations (->activation f1 :name 'f2 :size 1200))
    (f2 (->relu f2-activations))
    (f3-activations (->activation f2 :name 'f3 :size 1200))
    (f3 (->relu f3-activations))
    (prediction-activations (->activation f3 :name 'prediction :size 1))
    ;; Output Lump: ->squared-difference
    (prediction (->loss (->squared-difference (activations-output prediction-activations)
                                              (->input :name 'targets :size 1))
                        :name 'prediction))))
予測
出力層の予測部分の与え方が違うだけでほとんど同じ
(defun predict-regression-datum (fnn regression-datum)
  (let* ((a (regression-datum-array regression-datum))
         (len (mat-dimension a 0))
         (input-nodes (nodes (find-clump 'inputs fnn)))
         (output-nodes (nodes (activations-output (find-last-activation fnn)))))
    ;; set input
    (loop for i from 0 to (1- len) do
      (setf (mref input-nodes 0 i) (mref a i)))
    ;; run
    (forward fnn)
    ;; return output
    (reshape output-nodes (mat-dimension output-nodes 1))))
例: Rastrigin関数の近似
前に2個体分散GAの記事を書いたときに回帰の例として使ったRastrigin関数を近似してみる。
まずランダムな入力に対するRastrigin関数の値で訓練データセットを作り、格子状の入力でテストデータセットを作る。
それからデータを正規化する。訓練データの正規化パラメータと同じものでテストデータも正規化する必要がある。
最後に先に定義したfnn-regressionを使って訓練を実行する。
;;; Rastrigin function

(defun rastrigin (x-list)
  (let ((n (length x-list)))
    (+ (* 10 n)
       (loop for xi in x-list summing
	 (- (* xi xi) (* 10 (cos (* 2 pi xi))))))))

(defparameter *rastrigin-dataset*
  (let* ((n 10000)
         (arr (make-array n)))
    (loop for i from 0 to (1- n) do
      (let ((x (- (random 10.24) 5.12))
            (y (- (random 10.24) 5.12)))
        (setf (aref arr i) (make-regression-datum
                            :id (1+ i)
                            :target (make-mat 1 :initial-element (rastrigin (list x y)))
                            :array  (make-mat 2 :initial-contents (list x y))))))
    arr))

(defparameter *rastrigin-test*
  (let* ((n (* 64 64)) ; separate to 64x64 cells (by 0.16)
         (arr (make-array n)))
    (loop for i from 0 to 63 do
      (loop for j from 0 to 63 do
        (let ((x (- (* i 0.16) 5.04))
              (y (- (* j 0.16) 5.04)))
          (setf (aref arr (+ (* i 64) j))
                (make-regression-datum
                 :id (1+ (+ (* i 64) j))
                 :target (make-mat 1 :initial-element (rastrigin (list x y)))
                 :array  (make-mat 2 :initial-contents (list x y)))))))
    arr))

(defparameter *rastrigin-dataset-normal* (copy-regression-dataset *rastrigin-dataset*))
(defparameter *rastrigin-test-normal* (copy-regression-dataset *rastrigin-test*))
(regression-dataset-normalize! *rastrigin-dataset-normal*
                               :test-dataset *rastrigin-test-normal*
                               :noise-degree 0.0)

;; Run
(train-regression-fnn-process-with-monitor
 fnn-regression *rastrigin-dataset-normal*
 :test *rastrigin-test-normal* :n-epochs 500)
学習の進行過程の図。縦軸がRMSEで小さいほど良い。横軸は訓練データを何周したか。

左がオリジナルのテストデータで右が予測したもの。
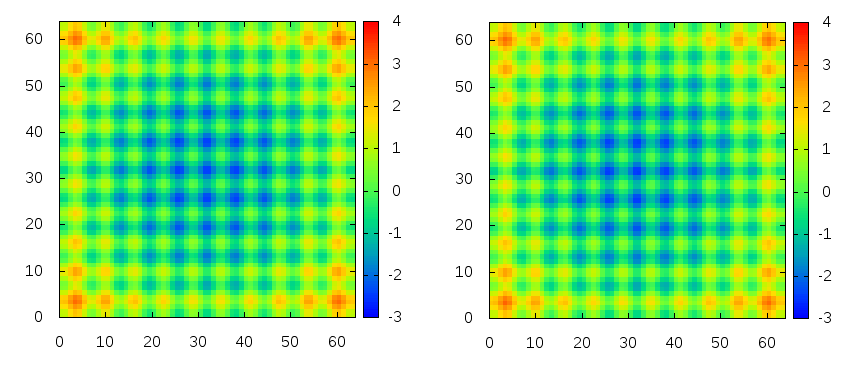
ほぼ再現できている。
TODO
次はLSTMを使った時系列データの認識をやってみる
Common Lispによる深層学習ライブラリMGL
昨今の機械学習界隈では何故かPythonやRのライブラリが多いのだが、Common Lispも高速なネイティブコンパイラを持ち、C/C++のライブラリも呼べるので、機械学習にも問題なく使える。
実際にCommon Lispで実装された深層学習を可能とするライブラリにMGLがあり、GithubでMITライセンスで公開されている。そんなわけで、先月のLispmeetup #39でMGLを紹介してきた。これがそのときのスライド。
MGLの作者Gábor Melis氏はKaggleの2014年の機械学習コンペHiggs Boson Machine Learning Challengeの優勝者で、今はDeepMindにいるらしい。このコンペのコードが公開されているが、MGLが使われていることが分かる。またMGLには深層学習以外にも進化計算や自然言語処理などのパッケージもあるらしい。ドキュメントもちゃんと書かれており、利用するのに必要な基本的材料は揃っているように見える。
MGLは行列演算に以前紹介したMGL-MATを使う。よってCPUであればOpenBLASやMKLなどを、GPUであればCUDAを利用して高速に学習できる。以前、自分でも多層ニューラルネットを実装してみたが、ごくごくナイーブな実装なので実用とは言えなかった。それに対して、MGLはPython/C++のライブラリと比べても遜色ない性能を示す(後述のベンチマーク参照)。
なお、MGLは少なくともLinuxとMacで動くはずだが、自分はLinuxでしか試してないので、Macでも動いたという人は教えてほしい。*1
GPUは別に必須というわけではなく、CPUのみで使う場合はCUDAのインストールも不要である。
- 現状MGLでできること
- 多層ニューラルネットワーク(ReLU、Maxoutなど各種活性化関数、Dropout完備)
- リカレントニューラルネットワーク、LSTM
- 制約ボルツマンマシン(RBM)ベースの教師なし事前学習(DBN、DBM)
- cl-cudaによるGPU計算、とてもはやい
- LLA経由でOpenBLAS等を使ってCPU計算、かなりはやい
- できないこと
- マルチGPUはできないっぽい
- 畳み込みニューラルネットワーク*2
MGLのインストール
MGL-MATはLLAとcl-cudaに依存する。LLAとMGL-MATのインストールについては以前の記事を参照。
MGL-MATのインストールさえできていればMGLのインストールは簡単で、GithubからMGLのソースをダウンロードしてきてquickloadするだけである。その他の依存ライブラリはQuicklispから入る。
cd ~/quicklisp/local-projects
git clone https://github.com/melisgl/mgl.git
(ql:quickload :mgl)
MGLに付属のMNISTのサンプルが長いので整理したものを作った。以下ではこのサンプルコードに従って話を進めていく。
cd ~/quicklisp/local-projects
git clone https://github.com/masatoi/mgl-user.git
(ql:quickload :mgl-user)
この中の src/example.lisp を読むと大体の流れが分かるかと思う。
MGL-MATの設定
深層学習では数値の精度はそれほど必要ではなく、単精度で十分らしい。*3 そこでMGL-MATで扱う数値のデフォルトの型を指定する変数*default-mat-ctype*の値を:doubleから:floatにしておく。特にGPU計算ではこの設定の有無で速度に大きな違いが出る。また、CUDAを使うかどうかを変数*cuda-enabled*によって制御できる。
;;; GPU向けの設定
(setf *default-mat-ctype* :float)
(setf *cuda-enabled* t)
MNISTデータの読み込み
MNISTデータの配布ページから4つのファイルをダウンロードしてきて、適当なディレクトリにgunzipなどで展開する。
次にそのディレクトリへのパスを設定する。
(defparameter *mnist-data-dir* "/path/to/mnist-data/")
この状態で以下を実行すると、変数*training-data*と*test-data*にデータが格納される。
(progn (training-data) (test-data) 'done)
これらのデータ読み込み関数はload-mnist.lispで定義されている。当然ながら他のフォーマットのデータを扱うときはこの部分は自分で書く必要がある。
さて、読み込んだデータはデータ点を表す構造体datumのベクタになっている。
MGL-USER> (aref *training-data* 0)
#S(DATUM
   :ID 1
   :LABEL 5
   :ARRAY #<MAT
            784 B #(0.0 0.0 0.0 0.0 0.0 0.0 0.0 0.0 0.0 0.0 0.0 0.0 0.0 0.0 0.0
                    ...
                    0.0 0.0 0.011764706 0.07058824 0.07058824 0.07058824
                    0.49411765 0.53333336 0.6862745 0.101960786 0.6509804 1.0
                    0.96862745 0.49803922 0.0 0.0 0.0 0.0 0.0 0.0 0.0 0.0 0.0
                    0.0 0.0 0.0 0.11764706 0.14117648 0.36862746 0.6039216
                    ...
0.0 0.0 0.0)>)datumのスロットは通し番号idと、正解ラベルlabel、そして実際のデータarrayの3つ。arrayが普通のCommon Lispの配列ではなくて、MGL-MATのMAT構造体になっていることに注意する。
モデル定義
フィードフォワードニューラルネットワークはfnnクラスのオブジェクトとして作られる。fnnのmake-instanceをラップするマクロとしてbuild-fnnがあるので、それを使って隠れ層2層のネットワークを作ってみるとこうなる。
(defparameter my-fnn
  (build-fnn (:class 'fnn :max-n-stripes 100)                     ; ミニバッチのサイズ100
    (inputs     (->input :size 784))                              ; 入力次元数784
    (f1         (->relu (->activation inputs :size 256)))         ; ユニット数256、活性化関数はReLU
    (f2         (->relu (->activation f1     :size 256)))         ; ユニット数256、活性化関数はReLU
    (prediction (->softmax-xe-loss (->activation f2 :size 10))))) ; 出力は10通りの値、活性化関数はソフトマックス関数
ここで定義されたネットワークの中身を見てみると、以下のようになっている。
MGL-USER> (describe my-fnn)
#<FNN {1014AC5903}>
BPN description:
  CLUMPS = #(#<->INPUT INPUTS :SIZE 784 1/100 :NORM 0.00000>
             #<->ACTIVATION (#:G1298 :ACTIVATION) :STRIPES 1/100 :CLUMPS 4>
             #<->RELU F1 :SIZE 256 1/100 :NORM 0.00000>
             #<->ACTIVATION (#:G1299 :ACTIVATION) :STRIPES 1/100 :CLUMPS 4>
             #<->RELU F2 :SIZE 256 1/100 :NORM 0.00000>
             #<->ACTIVATION (#:G1300 :ACTIVATION) :STRIPES 1/100 :CLUMPS 4>
             #<->SOFTMAX-XE-LOSS PREDICTION :SIZE 10 1/100 :NORM 0.00000>)
  N-STRIPES = 1
  MAX-N-STRIPES = 100
ネットワークの実体はlumpという、レイヤーのような役割を持つクラスのオブジェクトの集合で、lumpには->が接頭辞として付いている。またlumpは同名のlumpを生成する関数を持っている。例えば (->input :size 784) はサイズ784の入力層を表す->inputクラスのインスタンスを作る関数を呼ぶ。
build-fnnのキーワードオプション:classは生成するネットワークのオブジェクトのクラスで、:max-n-stripesがミニバッチのバッチサイズを表す。build-fnnの本体部分はlet*みたいなもので(実際let*に展開される)、lumpにつける名前とそのlumpを生成する関数呼び出しの対が並んでいる構造になっており、let*と同様に以前に束縛された変数を後の定義中で使うことができる。
lumpには->inputや->reluなどのユニットの値を持つものと、層間の線型写像を担当する->activationがある。この例では->input、->relu、->softmax-xe-lossがユニットの値を持っている。具体的には、順伝搬の値が入るnodesというスロットと、逆伝搬の値が入るderivativesというスロットを持っており、どちらもバッチサイズ×ユニット数の行列になっている。
例えば入力層のlumpを表示してみると以下のようになっており、nodesとderivativesに784次元の入力データをバッチサイズ分束ねて行列としたものが入っていることが分かる。
MGL-USER> (describe (aref (clumps my-fnn) 0))

#<->INPUT INPUTS :SIZE 784 100/100 :NORM 91.96476>
  [standard-object]

Slots with :INSTANCE allocation:
  NAME               = INPUTS
  SIZE               = 784
  NODES              = #<MAT 100x784 AF #2A((0.0 0.0 0.0 0.0 0.0 0.0 0.0 0.0 0.0 0.0 0.0 0.0..
  DERIVATIVES        = #<MAT 100x784 A #2A((-1.6850416e-7 1.7476857e-6 3.683108e-6..
  DEFAULT-VALUE      = 0
  SHARED-WITH-CLUMP  = NIL
  X                  = #<->INPUT INPUTS :SIZE 784 100/100 :NORM 91.96476>
  DROPOUT            = NIL
  MASK               = NIL
さて、次は隠れ層についてだが、隠れ層のlumpはその層における活性化関数の種類に応じて->relu、->sigmoid、->tanh、->maxoutなどの中から選ぶ。最近は深層学習にはReLUやMaxoutを使うことが多い。
出力層のlumpは、MNISTが分類問題であるので、活性化関数をソフトマックス関数、損失関数をクロスエントロピーとする ->softmax-xe-loss を使っている。->softmax-xe-lossにはtargetというスロットがあり、正解ラベルをバッチサイズ分並べたリストが入る。これが回帰問題であれば、活性化関数は恒等写像で損失関数は二乗誤差となり、代わりに ->squared-difference を使うことになる。回帰については別の記事で紹介できればと思う。
- >activationは前の層の出力から次の層の入力であるユニット活性を計算するためのlumpで、これ自体がlumpの集合を持つサブネットワークになっている。ここに学習対象である層間の重みやバイアスが入っている。
MaxoutとDropout
活性化関数にMaxoutを使うとネットワークを多層にしたときでも学習がうまくいくことが知られている。Maxoutは複数の線形ユニットからなる関数で、複数の直線からその入力における最大値を選ぶことによって下に凸な関数になる。そのため何個の直線を使うかをパラメータ:group-sizeで指定してやる必要がある。例えば5本の直線を使うなら以下のように書ける。
(->max activations :group-size 5)
Dropoutは学習のたびにユニットの一部を一定確率で無効化する。これは沢山のサブネットワークでアンサンブル学習しているようなもので、強い正則化の効果がある。例えば上の活性化関数でユニットの半分をランダムに無効化するときは、このように書ける。
(->dropout (->max activations :group-size 5) :dropout 0.5)
これらをまとめると、ネットワーク全体はこのように書ける。
(defparameter fnn-maxout-dropout
  (let ((group-size 5))
    (build-fnn (:class 'fnn :max-n-stripes 100)
      (inputs (->input :size 784 :dropout 0.2))                    ; 入力層は0.2の確率で無効化
      (f1-activations (->activation inputs :name 'f1 :size 1200))
      (f1* (->max f1-activations :group-size group-size))
      (f1 (->dropout f1* :dropout 0.5))                            ; 隠れ層は0.5の確率で無効化
      (f2-activations (->activation f1 :name 'f2 :size 1200))
      (f2* (->max f2-activations :group-size group-size))
      (f2 (->dropout f2* :dropout 0.5))
      (f3-activations (->activation f2 :name 'f3 :size 1200))
      (f3* (->max f3-activations :group-size group-size))
      (f3 (->dropout f3* :dropout 0.5))
      (prediction (->softmax-xe-loss (->activation f3 :name 'prediction :size 10)
                                     :name 'prediction)))))
ネットワークへの入出力の設定
こうしてネットワークのオブジェクトを生成したわけだが、学習や予測を行なうためには、まずこのネットワークに入出力を設定してやる必要がある。
入力は->inputのnodesスロットに、出力は->softmax-xe-lossのtargetスロットにそれぞれ設定する。これを行うメソッドがset-inputであり、例えば以下のように定義される。
(defmethod set-input (samples (bpn fnn))
  (let* ((inputs     (find-clump 'inputs     bpn))
         (prediction (find-clump 'prediction bpn)))
    (clamp-data samples (nodes inputs))                       ; バッチサイズ分の入力を設定
    (setf (target prediction) (label-target-list samples))))  ; バッチサイズ分の出力(正解ラベル)を設定
set-input によってネットワークに正しくデータの値が設定されるのであれば、データの表現は別に何でもいいということが分かる。
学習部分の定義
次に、学習を行なう関数を定義する。
ここでどんなアルゴリズムを使うか、学習の途中経過をモニタリングするか等を決める。例えばモーメンタムSGDを使って最適化するときは、以下のように書ける。
(defun train-fnn (fnn training &key
                                 (n-epochs 3000)
                                 (learning-rate 0.1) (momentum 0.9))
  (let ((optimizer (make-instance 'segmented-gd-optimizer
                      :segmenter
                      (constantly
                       (make-instance 'sgd-optimizer
                          :learning-rate learning-rate
                          :momentum momentum
                          :batch-size (max-n-stripes fnn)))))
        (learner (make-instance 'bp-learner :bpn fnn))
        (dateset (make-sampler training :n-epochs n-epochs)))
    (minimize optimizer learner :dataset dateset)
    fnn))
最適化の本体はminimizeで、最適化アルゴリズムを表すoptimizerと学習主体を表すlearnerを引数に取る。ここではoptimizerのところはモーメンタムSGDを指定しているが、他にもADAMなども使える。最適化アルゴリズムは学習率やモーメンタムなど独自のパラメータを持つ。
optimizerやlearnerには学習の途中経過を出力するモニター関数を噛ませることができて、例えば訓練データとテストデータに対する正答率を表示する関数log-bpn-test-errorを最適化の途中で一定間隔で実行する場合にはこのようにする。
(defun train-fnn-with-monitor (fnn training test
                               &key
                                 (n-epochs 3000)
                                 (learning-rate 0.1) (momentum 0.9))
  (let ((optimizer (monitor-optimization-periodically
                    (make-instance 'segmented-gd-optimizer-with-data
                       :training training
                       :test test
                       :segmenter (constantly
                                   (make-instance 'sgd-optimizer
                                      :learning-rate learning-rate
                                      :momentum momentum
                                      :batch-size (max-n-stripes fnn))))
                    '((:fn log-bpn-test-error :period log-test-period)
                      (:fn reset-optimization-monitors
                       :period log-training-period
                       :last-eval 0))))
        (learner (make-instance 'bp-learner :bpn fnn))
        (dateset (make-sampler training :n-epochs n-epochs)))
    (minimize optimizer learner :dataset dateset)
    fnn))
これらを使って、学習の進行過程全体はこのように書ける。
(defun train-fnn-process (fnn training test &key (n-epochs 30) (learning-rate 0.1) (momentum 0.9))
  (with-cuda* ()
    (repeatably ()
      (init-bpn-weights fnn :stddev 0.01) ; fnnの重みを初期化する
      (train-fnn-with-monitor
       fnn training test :n-epochs n-epochs :learning-rate learning-rate :momentum momentum)))
  fnn)
ここでwith-cuda*はMGL-MATの記事でも出てきたCUDAによる計算を有効化するためのマクロで、init-bpn-weightsは正規分布に従って重みの初期値を設定する関数。n-ephochは訓練データを何周するかを表す。
学習プロセスを実行
先に定義したmy-fnnを実際に学習させるとmy-fnn中の重みパラメータが破壊的に更新される。学習プロセス全体の出力は、
MGL-USER> (train-fnn-process my-fnn *training-data* *test-data* :n-epochs 10)
...
2016-05-22 18:40:16: ---------------------------------------------------
2016-05-22 18:40:17: training at n-instances: 600000
2016-05-22 18:40:17: test at n-instances: 600000
2016-05-22 18:40:18: pred. train bpn PREDICTION acc.: 99.75% (10000)
2016-05-22 18:40:18: pred. train bpn PREDICTION xent: 9.027d-5 (10000)
2016-05-22 18:40:18: pred. test  bpn PREDICTION acc.: 98.10% (10000)
2016-05-22 18:40:18: pred. test  bpn PREDICTION xent: 8.772d-4 (10000)
...
となって最終的にテストデータに対して98.10%の正答率であることが分かる。
Dropoutを入れた以下のネットワークで100エポックほど回すと98.96%までいった。
(defparameter fnn-relu-dropout
  (build-fnn (:class 'fnn :max-n-stripes 100)
    (inputs (->input :size 784 :dropout 0.2))
    (f1-activations (->activation inputs :name 'f1 :size 1200))
    (f1* (->relu f1-activations))
    (f1 (->dropout f1* :dropout 0.5))
    (f2-activations (->activation f1 :name 'f2 :size 1200))
    (f2* (->relu f2-activations))
    (f2 (->dropout f2* :dropout 0.5))
    (f3-activations (->activation f2 :name 'f3 :size 1200))
    (f3* (->relu f3-activations))
    (f3 (->dropout f3* :dropout 0.5))
    (prediction (->softmax-xe-loss (->activation f3 :name 'prediction :size 10)
                                   :name 'prediction))))
サンプルファイルのコメントによると、DBMで事前学習してからDropoutありでファインチューニングすることによって99.22%までいくらしい。
予測
データセットの検証にはmonitor-bpn-resultsという関数が用意されており、例えば以下のように使う。
(defun test-fnn (fnn test)
  (monitor-bpn-results (make-sampler test :max-n (length test))
                       fnn
                       (make-datum-label-monitors fnn)))
MGL-USER> (test-fnn my-fnn *test-data*)
(#<CLASSIFICATION-ACCURACY-COUNTER bpn PREDICTION acc.: 98.10% (10000)>
 #<CROSS-ENTROPY-COUNTER bpn PREDICTION xent: 8.772d-4 (10000)>)
個々のデータを予測するには、ネットワークの入力層のnodesに値を設定し、forward関数をネットワークを引数として呼んだ後、出力層のnodesを見れば予測結果が入っている。
(defun predict-datum (fnn datum)
  (let* ((a (datum-array datum))
         (len (mat-dimension a 0))
         (input-nodes (nodes (find-clump 'inputs fnn)))
         (output-nodes (nodes (find-clump 'prediction fnn))))
    ;; set input
    (loop for i from 0 to (1- len) do
      (setf (mref input-nodes 0 i) (mref a i)))
    ;; run
    (forward fnn)
    ;; return output
    (reshape output-nodes (mat-dimension output-nodes 1))))
例えば、訓練データの最初のデータを学習済みのmy-fnnによって予測してみると、以下のような合計が1になるような確率リストが表示される。
MGL-USER> (predict-datum my-fnn (aref *training-data* 0))
#<MAT 0+10+990 - #(1.6357367e-20 1.007323e-17 1.829405e-18 1.9152902e-5
                   3.730603e-23 0.9999808 4.772671e-19 6.1250017e-20
                   1.6942288e-18 2.232391e-16)>
このうち最も確率が高いクラス5が予測結果となり、データの正解ラベルも5なので正解していることが分かる。
ベンチマーク
MNISTを多層ニューラルネットで学習する例をTensorflow、Chainerと比較してみる。
LLAでOpenBLASを使っているので、NumpyでもOpenBLASを使うようにする。(参考: http://qiita.com/unnonouno/items/8ab453a1868d77a93679)
~/.numpy-site.cfg に
[openblas]
libraries = openblas
library_dirs = /usr/lib/openblas-base/
include_dirs = /usr/include/
runtime_library_dirs = /usr/lib/openblas-base/
と書いて pip install numpy するとOpenBLASを使うようになる。
Tensorflowの多層ニューラルネットの例はこれを元にした。ChainerにはMNISTのサンプルが付属するのでそれを元にした。
隠れ層は2層。どちらもユニット数は256、活性化関数をReLU、最適化アルゴリズムをモーメンタムSGDとし、バッチサイズ100で15エポック学習したときの、学習部分のみに要した時間で比較する。環境は Core i5 4670、GeForce GTX 750Ti。
結果はこのようになる。

まとめ
- MGLの特徴
- 速い
- 行列演算に関わる部分以外はすべてCommon Lispで実装されており、Common Lispで拡張可能
- 実行速度を出すために副作用を使いまくっているので関数型的とはいえない
- 個々のケースにおいて実装しなければならないこと。決めなければならないこと
TODO
- MNISTのサンプルではさらにL2正則化をやっているのでそこを詳しく見ていく。
- 回帰問題の例
- RNN/LSTMの例
- Dropconnectの実装
- 前処理で精度が上がるか: Grobal contrast normalizationなど http://www.slideshare.net/Takayosi/miru2014-tutorial-deeplearning-37219713 P.53
rosスクリプト練習: PDFをPNG画像で出力
元々の動機:impressで作ったスライドを1920x1080ピクセルでまとめて画像保存したい。
impressからPDFに出力して、xpdfに付属するコマンドpdftoppmで画像のセットに変換した後、image-magickのconvertでppmからpngに変換する。
#!/bin/sh
#|-*- mode:lisp -*-|#
#|
exec ros -Q -- $0 "$@"
|#

(ql:quickload :uiop :silent t)
(ql:quickload :cl-ppcre :silent t)

(defun catstr (&rest args)
  (apply #'concatenate 'string args))

(defun format-directory (p)
  (assert (eq (car (pathname-directory p)) :absolute))
  (reduce (lambda (a b) (catstr a b "/"))
          (cons "/" (cdr (pathname-directory p)))))

(defun format-pathname (p &optional type)
  (format nil "~A~A.~A" (format-directory p) (pathname-name p) (if type type (pathname-type p))))

(defun pwd ()
  (truename "./"))

(defun ls (&optional dir)
  (uiop:directory-files (if dir dir (pwd))))

(defun main (&rest argv)
  (declare (ignorable argv))
  (assert (= (length argv) 2))
  (assert (uiop:file-exists-p (first argv)))

  ;; create ppm images (1920x1020px)
  (uiop:run-program (list "pdftoppm" "-rx" "174.02" "-ry" "174.2" (first argv) (second argv)))

  ;; select ppm images
  (let ((ppm-files
         (remove-if-not
          (lambda (p) (and (equal (pathname-type p) "ppm")
                           (ppcre:scan (catstr "^" (second argv) ".*") (pathname-name p))))
          (ls))))
    (dolist (ppm-file ppm-files)
      ;; convert ppm image to png
      (uiop:run-program (list "convert"
                              (format-pathname ppm-file)
                              (format-pathname ppm-file "png")))
      ;; remove ppm image
      (uiop:run-program (list "rm" (format-pathname ppm-file))))))
$ pdftopng input.pdf output
$ ls
input.pdf output-1.png output-2.png output-3.png
カレントディレクトリを取得する方法:逆引きCommon Lisp: 処理系を起動したディレクトリのパスネームを返す
カレントディレクトリは (uiop:getcwd) でも取れるらしい。
merge-pathnameがあればcdは別にいらないかな。
単にsbcl --scriptだとquicklispが読み込まれなかったりして、ライブラリ読み込み済のコアイメージをダンプしなければいけなかったりと色々と面倒(sbclでscriptオプションを利用したさいにquicklispが利用できなくなってしまう)。roswellを使うと引数の取り扱いや処理系の終了など何も考えなくていいので楽。
shebangに色々書くという方法もあるらしいけど(あなたの知らないShebang)、eshellだと動かなかった。やはりroswellか。
Common LispからGnuplotでグラフ表示するライブラリを作った: clgplot
オレオレユーティリティ集からプロット周りを切り出したのでgithubに置いてみる。
https://github.com/masatoi/clgplot
なおGnuplot4を必要とする。macで動くかは分からない。昔に書いたものなのでUIOPじゃなくてexternal-programを使っているところがアレである。
Gnuplotのフロントとしては似たようなのが沢山ある気がするが、Gnuplotを非同期に呼び出してコマンドを一つずつ渡していくというよりも、一気にGnuplotスクリプトに書き出してデータとともにGnuplotに渡すということがしたかったように思う。具体的には、リスト等の中身を/tmp/gnuplot-tmp.datに出力して、/tmp/gnuplot-tmp.gpにGnuplotスクリプトを書き出してpersistオプション付きでgnuplotを呼び出す。
インストール
cd ~/quicklisp/local-projects
git clone https://github.com/masatoi/clgplot.git
(ql:quickload :clgplot)
gnuplotにパスが通ってないとか一時ファイルのできる場所を変えたいとかいうときは変数を設定する必要があるかもしれない。以下はデフォルト値。
(in-package :clgplot)
(defparameter *gnuplot-path* "gnuplot")
(defparameter *tmp-dat-file* "/tmp/gnuplot-tmp.dat")
(defparameter *tmp-gp-file* "/tmp/gnuplot-tmp.gp")
使い方
まず、単にシーケンスを渡せばグラフが表示される(Qキーで閉じる)
(plot '(1 2 3))
;; または
(plot #(1 2 3))
(defparameter *x-list* (loop for i from (- pi) to pi by 0.1 collect i))
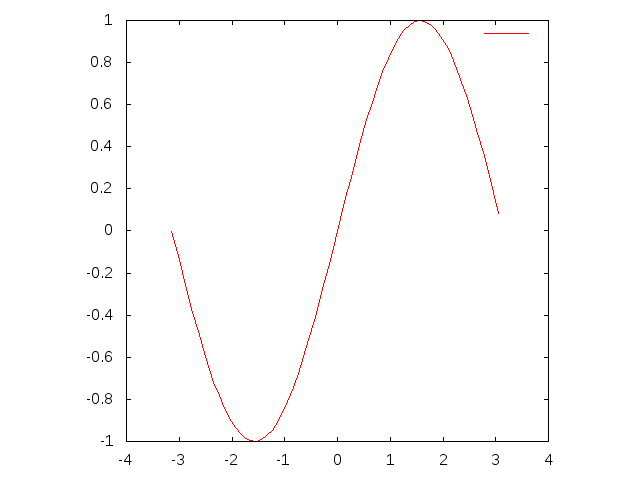
(plot (mapcar #'sin *x-list*))

何も指定しないと横軸はデータ番号になる。x軸に定義域を指定したいときは、x-seqキーワードオプションを使う。
(plot (mapcar #'sin *x-list*) :x-seq *x-list*)
複数グラフ
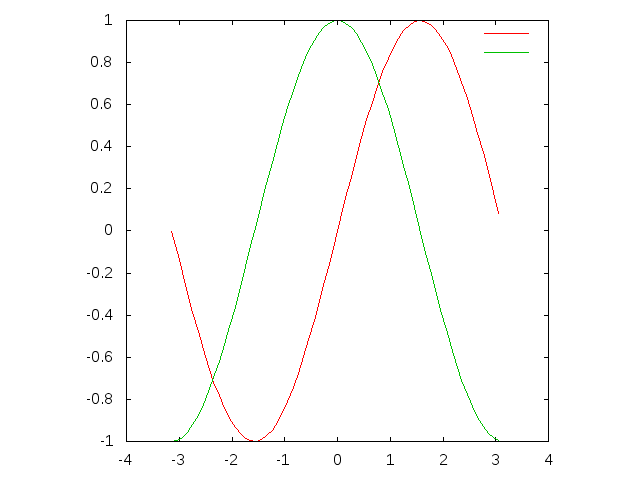
複数のグラフを描きたいときはplotsを使ってシーケンスのシーケンスを渡す。それに対応して定義域もシーケンスのシーケンスになり、x-seqsで指定する。
(plots (list (mapcar #'sin *x-list*)
             (mapcar #'cos *x-list*))
       :x-seqs (list *x-list* *x-list*))
(plots (list (mapcar #'sin *x-list*)
             (mapcar #'cos *x-list*)
             (mapcar #'tan *x-list*))
       :x-seqs (list *x-list* *x-list* *x-list*))
表示範囲を指定
表示範囲を指定するにはx-range、y-rangeオプションを使う。
(plots (list (mapcar #'sin *x-list*)
             (mapcar #'cos *x-list*)
             (mapcar #'tan *x-list*))
       :x-seqs (list *x-list* *x-list* *x-list*)
       :x-range (list (- pi) pi)
       :y-range '(-1 1))
凡例、軸の説明を追加
説明が無いと寂しいので、title-listで凡例を、x-labelとy-labelで軸の説明を指定する。
(plots (list (mapcar #'sin *x-list*)
             (mapcar #'cos *x-list*)
             (mapcar #'tan *x-list*))
       :x-seqs (list *x-list* *x-list* *x-list*)
       :x-range (list (- pi) pi)
       :y-range '(-1 1)
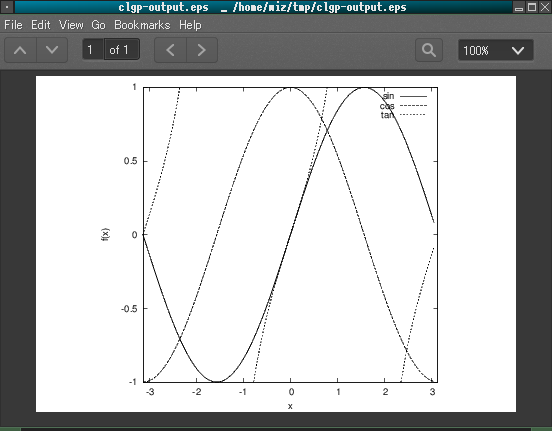
       :title-list '("sin" "cos" "tan")
       :x-label "x"
       :y-label "f(x)")
ファイル出力
グラフが描けたので次はファイルに出力する。outputオプションでパスを指定すればそこに画像ファイルができる。
画像のフォーマットはデフォルトは640x480のPNGだが、output-formatオプションで他にも色々指定することができる。(:PDF :EPS :EPS-MONOCHROME :PNG :PNG-1280X1024 :PNG-2560X1024 :PNG-MONOCHROME が使える)
例えば、論文とかに貼り付けたいときはベクタ形式でモノクロのEPS-MONOCHROMEを指定する。など。
;; PNGファイル出力
(plots (list (mapcar #'sin *x-list*)
             (mapcar #'cos *x-list*)
             (mapcar #'tan *x-list*))
       :x-seqs (list *x-list* *x-list* *x-list*)
       :x-range (list (- pi) pi)
       :y-range '(-1 1)
       :title-list '("sin" "cos" "tan")
       :x-label "x"
       :y-label "f(x)"
       :output "/home/wiz/tmp/clgp-output.png")

;; フォーマット指定
(plots (list (mapcar #'sin *x-list*)
             (mapcar #'cos *x-list*)
             (mapcar #'tan *x-list*))
       :x-seqs (list *x-list* *x-list* *x-list*)
       :x-range (list (- pi) pi)
       :y-range '(-1 1)
       :title-list '("sin" "cos" "tan")
       :x-label "x"
       :y-label "f(x)"
       ;; :PDF :EPS :EPS-MONOCHROME :PNG :PNG-1280X1024 :PNG-2560X1024 :PNG-MONOCHROME
       :output-format :eps-monochrome
       :output "/home/wiz/tmp/clgp-output.eps")
スタイル
デフォルトではデータ点を繋ぐ線を表示するが、styleオプションによってデータ点を点として表示させたり、x軸からの距離(インパルス)を表示させることもできる。
(defparameter *x-list2*
  '(-3.14 -2.64 -2.14 -1.64 -1.14 -0.64 -0.14 0.358 0.858 1.358 1.858 2.358 2.858 3.14))

(plot (mapcar #'sin *x-list2*) :style 'line)
(plot (mapcar #'sin *x-list2*) :style 'points)
(plot (mapcar #'sin *x-list2*) :style 'impulse)

plot-listsではスタイルにリストを指定できるので、これらを組合せることができる。
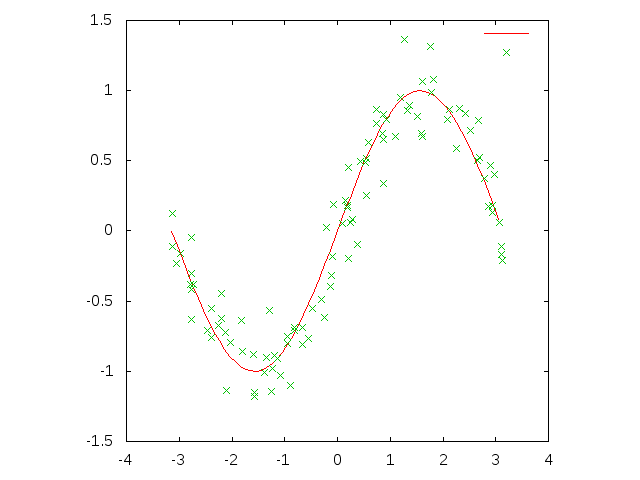
例えば、sin関数の周りに正規分布からサンプリングしたデータ点を散らす場合はこうなる。
;; Box-Muller法による1次元正規分布のサンプリング
(defun random-normal (&key (mean 0d0) (sd 1d0))
  (let ((alpha (random 1.0d0))
	(beta  (random 1.0d0)))
    (+ (* sd
	  (sqrt (* -2 (log alpha)))
	  (sin (* 2 pi beta)))
       mean)))

(let* ((rand-x-list (loop repeat 100 collect (- (random (* 2 pi)) pi)))
       (rand-y-list (mapcar (lambda (x) (+ (sin x) (random-normal :sd 0.2d0))) rand-x-list)))
  (plots (list (mapcar #'sin *x-list*)
               rand-y-list)
         :x-seqs (list *x-list* rand-x-list)
         :style '(line point)))
3次元プロット
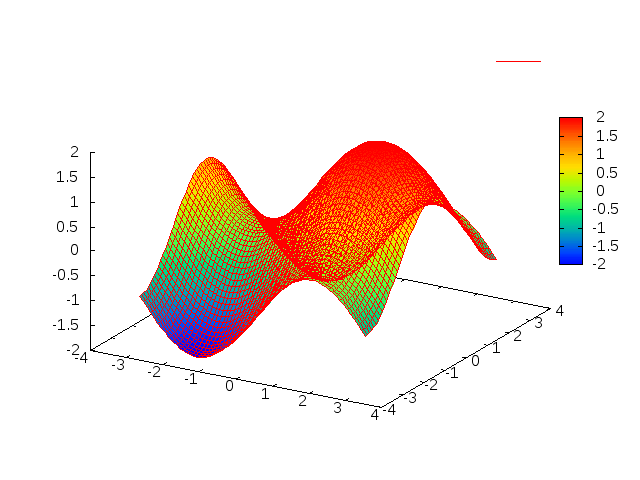
3次元の画像をプロットしたいときは、x軸とy軸の定義域リストと、z軸の値となる2変数関数を与える。例えば、z=sin(x)+cos(y)を表示したいときはこうする。
(splot (lambda (x y) (+ (sin x) (cos y)))
       *x-list*  ; x-list
       *x-list*) ; y-list
(splot (lambda (x y) (+ (sin x) (cos y)))
       *x-list* ; x-list
       *x-list* ; y-list
       :map t)

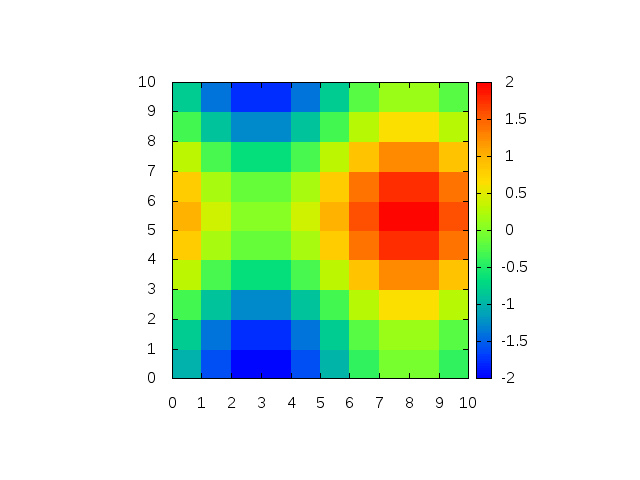
人には行列(二次元配列)の値をプロットしたい状況というものがある。そんな時はsplot-matrix関数を使う。
(defparameter mat (make-array '(10 10)
                              :initial-contents
                              (loop for i from (- pi) to (- pi 0.1) by (/ pi 5) collect
                                (loop for j from (- pi) to (- pi 0.1) by (/ pi 5) collect
                                  (+ (sin i) (cos j))))))

(splot-matrix mat)
ヒストグラム
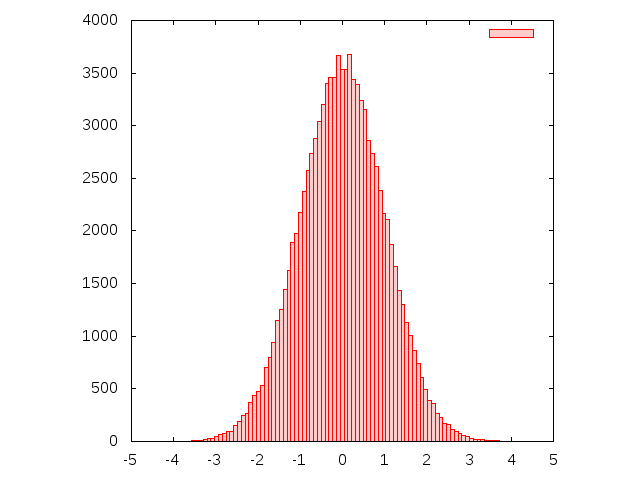
ヒストグラムはplot-histgramで表示する。第一引数はサンプルのリスト、第二引数がビンの数である。例えば標準正規分布から10000個サンプリングしてきてビン100個でプロットしてみるとこうなる。
(plot-histogram (loop repeat 100000 collect (random-normal)) ; samples
                100) ; number of bin
感想
ほとんどの機能をplotなどのキーワードオプションに集約させているので、使い方を覚えていなくてもSLIMEの引数補完でキーワードオプションを表示させれば大体分かるというのが気に入っている。
Common Lispで行列演算(2): MGL-MATを使う
前回LLAによるCPUを使った行列演算の話をしたので、今回はGPUを使った行列演算の話。
そもそものやりたいこととしては、機械学習ライブラリのMGLをインストールしたいのだが、Quicklispから入るMGLはバージョンが古く、cl-cudaに依存する最新版を入れるにはいくつかのパッケージをGithubからcloneしてくる必要がある。この依存パッケージのインストールなどでつまったので、とりあえずcl-cudaとMGL-MATをインストールして行列積を計算させるところまでのメモを残しておく。
2016/12/3追記: cl-cuda及びMGL-MATがQuicklispに登録されたのでGithubからダウンロードする必要はなくなった。
LLAのインストール
MGL-MATは前回紹介したLLAに依存しているので、前回記事の手順でインストールする。BLASライブラリの場所を設定する必要があるので注意。
CUDA7.5のインストール
GPUを使った行列演算をさせる場合は、まずCUDAをインストールしなければならない。CPUのみで利用する場合はCUDAのインストールは不要。
cl-cudaのREADMEにはCUDA5.5までしか動作確認が載っていないので一抹の不安を覚えつつ、CUDAの現時点での最新版7.5をダウンロードしてきてインストールする。
ディストリビューションによってインストール方法が違うのでクイックスタートガイド(PDF)を参照。Utuntuの場合は上記ダウンロードページからdebファイルをダウンロードしてきてdpkgからインストールした後に、apt-getすればいいらしい。
$ sudo dpkg --install cuda-repo-<distro>-<version>.<architecture>.deb
$ sudo apt-get update
$ sudo apt-get install cuda
ここまででGPUのドライバが更新されたのでシステムを再起動する。
環境変数を設定する
自分の場合は~/.bashrcにこう書いておいた
export PATH=$PATH:/usr/local/cuda-7.5/bin
export LD_LIBRARY_PATH=$LD_LIBRARY_PATH:/usr/local/cuda-7.5/lib64
export C_INCLUDE_PATH=$C_INCLUDE_PATH:/usr/local/cuda-7.5/include
cl-cuda、MGL-MATのインストール
2016/12/3追記: cl-cuda及びMGL-MATがQuicklispに登録されたのでこのステップは不要になった
次に、さしあたって必要になるCommon Lispのパッケージを~/quicklisp/local-projects/以下にダウンロードしてくる。
$ cd ~/quicklisp/local-projects/
$ git clone https://github.com/arielnetworks/cl-pattern.git
$ git clone https://github.com/osicat/osicat.git
$ git clone https://github.com/takagi/cl-cuda.git
$ git clone https://github.com/melisgl/mgl-mat.git
先に設定した環境変数が有効になっているターミナルからSBCLを起動して、
(ql:quickload :mgl-mat)
で依存関係から全部コンパイルされる。CUDAを使わずにCPUでだけ使いたいという場合であっても同様の手順でいけるが、その場合環境変数の設定は不要。CUDAがインストールされていないことが自動的に判別されCPUモードになる。
次にテストが通るか確認してみる。
(ql:quickload :cl-cuda-test)
(ql:quickload :mgl-mat-test)
(in-package :mgl-mat)
(test)
SLIMEのLisp処理系を環境変数つきで起動する
このままSLIMEを起動しても実行時にエラーが出る。どうやら環境変数が反映されていないらしい。 .emacs等でLisp処理系を指定するところに:envキーワードを付けることで環境変数を指定できる。
(setq inferior-lisp-program "sbcl")

(add-to-list 'slime-lisp-implementations
             '(sbcl ("sbcl" "--core" "/home/wiz/lib/sbcl/sbcl.core" "--dynamic-space-size" "4096" "--noinform")
               :env ("PATH=/usr/local/sbin:/usr/local/bin:/usr/sbin:/usr/bin:/sbin:/bin:/usr/local/cuda-7.5/bin"
                     "C_INCLUDE_PATH=/usr/local/cuda-7.5/include"
                     "LD_LIBRARY_PATH=/usr/local/cuda-7.5/lib64")))

;; roswellを使う場合
(add-to-list 'slime-lisp-implementations
             '(sbcl-ros ("ros" "-L" "sbcl-bin" "-Q" "dynamic-space-size=4096" "-l" "~/.sbclrc" "run")
               :env ("PATH=/usr/local/sbin:/usr/local/bin:/usr/sbin:/usr/bin:/sbin:/bin:/usr/local/cuda-7.5/bin"
                     "C_INCLUDE_PATH=/usr/local/cuda-7.5/include"
                     "LD_LIBRARY_PATH=/usr/local/cuda-7.5/lib64")))
MGL-MATで行列積を試してみる。
ディープラーニングの計算で必要になるのは行列積なので、CPUに対してどれくらい速くなっているかを見る。
まずは行列を作って初期値をランダムに設定する。
(in-package :mgl-mat)

(defparameter *size* 3)

;; ctypeのデフォルトは倍精度 :double 。単精度の場合は :float を与える
(defparameter ma (make-mat (list *size* *size*) :ctype :float))
(defparameter mb (make-mat (list *size* *size*) :ctype :float))
(defparameter mc (make-mat (list *size* *size*) :ctype :float)) ; 結果が破壊的に代入される行列

(defun randomize (m)
  "行列の要素を[0, 1]の範囲の乱数で初期化する"
  (destructuring-bind (rows cols)
      (mat-dimensions m) ; array-dimensionsじゃなくてmat-dimensions
    (dotimes (row rows)
      (dotimes (col cols)
        (setf (mref m row col) (random 1.0))))) ; arefじゃなくてmref
  m)

(randomize ma)
;; #<MAT 3x3 ABF #2A((0.64851093 0.82050586 0.2198838)
;;                   (0.6513314 0.78702486 0.7623421)
;;                   (0.19958317 0.3317876 0.087501764))>
(randomize mb)
;; #<MAT 3x3 ABF #2A((0.49600554 0.36851585 0.93187964)
;;                   (0.665609 0.85561895 0.8448553)
;;                   (0.031312823 0.5805893 0.41502512))>
行列積をやる関数はgemm!で、その計算式は C = alpha * AB + beta * C なので、単純にABの結果をCに代入したいときはalpha=1.0、beta=0.0にすればいい。
(gemm! 1.0 ma mb 0.0 mc)
;; #<MAT 3x3 AF #2A((0.87468624 1.0686891 1.3888001)
;;                  (0.87078595 1.356027 1.5882758)
;;                  (0.3225751 0.4082359 0.50261545))>
実は上の行列積はLLAを使った計算で、CPUしか使っていない。cudaを使った計算をするにはwith-cuda*マクロを使う。
(with-cuda* ()
  (gemm! 1.0 ma mb 0.0 mc))

(print
 (with-cuda* ()
   (print (gemm! 1.0 ma mb 0.0 mc))))

;; #<MAT 3x3 aCf #2A((0.8746863 1.0686891 1.3888001)
;;                   (0.8707859 1.356027 1.5882758)
;;                   (0.3225751 0.4082359 0.50261545))>
;; #<MAT 3x3 AF #2A((0.8746863 1.0686891 1.3888001)
;;                  (0.8707859 1.356027 1.5882758)
;;                  (0.3225751 0.4082359 0.50261545))>
MAT構造体のサイズの後ろにAとかCとかついているが、with-cuda*の中の世界ではCUDAの配列として扱われているようで、with-cuda*から出るときにCommon Lispの配列としてアクセスするようになるらしい。
時間測定用の関数は
(defun run (size &optional (n 100))
  "gemmをn回計算して実行時間を測定する。行列の初期化は計測しない。"
  (let ((ma (randomize (make-mat (list size size) :ctype :float)))
        (mb (randomize (make-mat (list size size) :ctype :float)))
        (mc (make-mat (list size size) :ctype :float)))
    (time
     (with-cuda* ()
       (loop repeat n
             do (gemm! 1.0 ma mb 0.0 mc)
             finally (return nil))))))
実行結果
計測した実行時間を、前回LLAでやってみたときの図にプロットしてみるとこうなる。横軸が行列のサイズで、縦軸が行列積を100回やったときの時間である。環境はUbuntu 14.04、CPUはCore i5 6440、GPUはGeforce GTX 750 Ti。

さすがにGPUを使っているMGL-MATはCPUよりも速い。
OpenBLASとcuBLAS(MGL-MAT)を抜き出して4000次元まで比較してみると約7倍の開きがある。

実行してみると、行列積そのものは速いのだが、行列の初期化にえらい時間がかかっている。arefと違ってmrefは非常に重い計算らしく、randomizeに時間を取られているっぽい。自分で定義しなくても行列を一様分布や正規分布でランダマイズする関数がついていて、CUDAによる高速化が効くのでwith-cuda*の中で初期化する。
(defun run2 (size &optional (n 10000))
  "gemmをn回計算して実行時間を測定する。行列の初期化は計測しない。"
  (let ((ma (make-mat (list size size) :ctype :float))
        (mb (make-mat (list size size) :ctype :float))
        (mc (make-mat (list size size) :ctype :float)))
    (time
     (with-cuda* ()
       (uniform-random! ma :limit 1.0)
       (uniform-random! mb :limit 1.0)
       (loop repeat n
             do (gemm! 1.0 ma mb 0.0 mc)
             finally (return nil))))))
runとrun2の実行時間は、
MGL-MAT> (time (run 1000 100))
Evaluation took:
  0.557 seconds of real time
  0.548603 seconds of total run time (0.453418 user, 0.095185 system)
  98.56% CPU
  1,886,762,588 processor cycles
  98,240 bytes consed

Evaluation took:
  4.812 seconds of real time
  4.779511 seconds of total run time (4.659018 user, 0.120493 system)
  [ Run times consist of 0.009 seconds GC time, and 4.771 seconds non-GC time. ]
  99.33% CPU
  16,322,222,280 processor cycles
  588,154,320 bytes consed

NIL
MGL-MAT> (time (run2 1000 100))
Evaluation took:
  0.532 seconds of real time
  0.520530 seconds of total run time (0.425539 user, 0.094991 system)
  [ Run times consist of 0.005 seconds GC time, and 0.516 seconds non-GC time. ]
  97.93% CPU
  1,805,827,497 processor cycles
  12,098,320 bytes consed

Evaluation took:
  0.533 seconds of real time
  0.520857 seconds of total run time (0.425852 user, 0.095005 system)
  [ Run times consist of 0.005 seconds GC time, and 0.516 seconds non-GC time. ]
  97.75% CPU
  1,806,942,422 processor cycles
  12,098,320 bytes consed
次はMGLでDeep Belief NetworkでMNISTをやる。

